airbrush cleaning pot instructions
Do you own an airbrush gun? If so, where do you clean it? When I airbrush I stand by the sink so I can easily rinse out the gun in between each color. Then the other day I was watching The Cookie Countess on Periscope and she had an airbrush cleaning pot. An airbrush cleaning pot so she could rinse out her airbrush gun no matter where she was when she was using the gun. I decided I wanted one so I could sit at the table and airbrush instead of being chained to the sink. When I looked them up online I noticed they are about $15 to $30. Not bad but being the DIY kinda person I am I decided to make my own airbrush cleaning pot with things I have around the house. I surprised myself by how quickly I made it and how simple it is to make. I knew I had to share this with you immediately. Keep in mind, I am not trying to talk you out of buying your own professional airbrush cleaning pot, I am just trying to save you a little money by showing you how simple it is to make your own with things you probably have laying around the house.

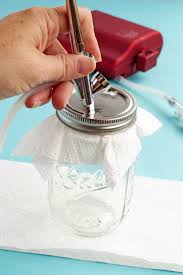
I have been using mine for about a week now and it is a game changer. I can airbrush cookies while filming videos for you without running to the sink every few minutes.This is so simple it will be over before you know it so hold on tight and let’s do this! Hole punch one hole on the Mason Jar lid making sure to push the hole to the back side of the lid so the top will be nice and smooth when we are done. It might not pop out the little ‘chad’ but that is alright because I will show you how to knock it off in a minute. See, no matter how hard I squeezed my little 69¢ hole punch from the Dollar General could not pop out the hole. I am smarter than a Mason Jar lid! At least I hope so. Move to the opposite side of the lid and punch three more holes. These holes are going to act as the filter when we place the lid on the jar. Remember those hateful little holes that wouldn’t pop out? We are going to make them pop out with our needle nose pliers. Just place the tip of the plier on the punched hole and push.

It will easily push through. Flip the lid over and use the pliers to remove those pesky little ‘chads.’ Remember when I told you to make sure the hole was punched toward the backside of the lid? That is because the lid will be jagged where the holes were punched. Take your pliers and stick the nose into the holes and twist to make each hole smooth. Do this from the top side of the lid. Repeat with a Sharpie. I did this because if I pulled the end of the Sharpie out and it was cut in anyway, I used the pliers again to make sure the holes were smooth. I thought it would be better to damage a Sharpie instead of my fingers. The back of the lid will never be completely smooth again but I used a fingernail file to help smooth off the rough edges. Be careful you don’t cut your fingers when pushing the fingernail file over the sharp metal and when washing it. I don’t want you to damage your decorating hand! I debated on covering the lid with a thin piece of cloth or a paper towel.

I chose a paper towel as my filter but if the moisture makes the paper towel wet to the point it needs to be replaced more than once during an airbrush session, I will switch it for a thin piece of cloth. Attach the lid start airbrushing!An airbrush cleaning pot and I didn’t have to buy one single thing! You’ve gotta love that! When you are ready to wash out your gun, stick it in the lid and pull the trigger. Add a little water and rinse it out until the gun runs clean with no airbrush color coming through.
dangers of ozone in air purifiersI love this new “free” tool!
steeda cold air intake cleanerI didn’t have to buy a thing and I don’t have to worry about storing something that is just used on cookies.
honeywell 5-in-1 true tower air purifier black review
I can wash the jar and place the lid in my airbrush gun box. If you don’t feel like punching holes in lids don’t worry, I have another way to make this bad boy. I must tell you that the lid on the Parmesan Cheese can doesn’t fit as well as I would like so I prefer the Mason Jar lid. But if you don’t pick it up by the cute little green lid I think this one will work for you. It is snug but I want something tighter because I spill things and drop things. But if you are careful, this will work for you. Here is a video to show you how to make the Mason Jar lid and how to use the Parmesan Cheese lid. Enjoy your airbrush cleaning pot! I know I am enjoying mine and you will see it in my videos from time to time! More on Airbrushing Cookies: Airbrush Gun Replacement for $25 How to Hold an Airbrush Gun How to Stencil Cookies with an Airbrush Gun posted in Airbrush, The Bearfoot Baker, Tips, Tutorials, Videos Sold by TCP Global Corp and Fulfilled by Amazon.

Gift Card when you subscribe to Creativebug. 700+ award-winning art & craft classes. Master Airbrush 3-in-1 Cleaning Pot with Holder; Cleans and Holds Airbrush, Color Palette LidDetailsIwata-Medea Airbrush Cleaner (8 oz.) Add-on ItemFREE Shipping on orders over $49. DetailsMaster Airbrush Brand - Airbrush Cleaning KIT #1 Spray GUN & Airbrush Clean Set, Everything You Need… 5.6 x 5.4 x 5.3 inches 1.6 pounds (View shipping rates and policies) #472 in Arts, Crafts & Sewing > Painting > Paints & Finishes #32,236 in Office Products > Office Supplies Works like a Charm. Easy to clean, but I wish more filters can with it. Too big and bulky and heavy. Only works for standard airbrush tools. didn't really need it very limited use I bought one of these direct from TCP, rather than going through Amazon, and here's what I found:Pros:- It's big and heavy, allowing it to hold a lot of... This is a soild product that is reliable and durable I have had one for 3 years no problems till i lost it and got the same model as a replacement.