airbrush nozzle cleaning needle

The fact is that most of the problems that occur with airbrushes are related to lack of or wrong cleaning of theTherefore I have assembled the following pictorial guide in which I demonstrate how I usually clean my own airbrush. The airbrush I use is Harder-Steenbeck Evolution, but the instructions generally apply to all metal airbrushes of different brands, since they are all similar inOne exception is the Aztek line of airbrushes because of their integrated nozzle/needle modules which according to the manufacturer cannot be disassembled for cleaning (actually they can, but that as they say is a completely different story). There are some things you are going to need to do the I normally use Ajax alcohol--based window cleaner and ethyl acetate for cleaning. Some sorts of nail polish remover also work fine for cleaning (you need to pick an oil-less type). I found the one shown in my local H&M store. It's made up of 50%

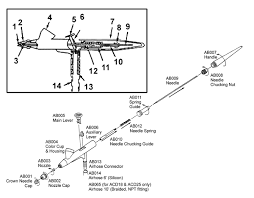
isopropyl alcohol and 50% ethyl acetate. Ideal for airbrush cleaning and much cheaper than to buy pure ethyl acetate or isopropyl alcohol at the can be found in pharmacies orThey come in different sizes. I prefer the 0.6 mmUsually there's a holder/handle included in the pack to simplify handling of the brush. Start the cleaning by putting some window cleaner in the paint cup and spray it through the airbrush (assuming that you used acrylic paints for your painting, otherwise use another suitable solvent). Then take a cotton swab and rub it around the walls in the cup to loosen any paint stuck to it. and do it over again until the cup is fairly clean. After this you can start disassembling the airbrush. Normally you don't have to disassemble the airbrush Now, let's remove the needle. needle nut (A), then remove the needle fromNow the word of caution: always remove the needle by pulling it forward. This way you avoid dragging paint into the back part of the

Put the small parts into a cup filled with ethyl or some other strong solvent. Let them soak there while you clean the rest
air duct cleaning tempe Cleaning the interior parts starts with the needle.
honeywell 5-in-1 true tower air purifier black review Wet a cotton swab with solvent, then rub it along the length of the needle until the paint comes off.
car aircon cleaning mandaluyong Wipe the needle off with paper/tissue. Repeat until the needle is Sometimes the needle gets tiny scratches or marks. If this occurs you can polish it carefully with the finest pad of a nailI put the needle between the pad and my thumb and twist it with my other hand. Don't overdo it or you might wear the needle down.

Just do enough to remove the scratches and make the needle nice and shinyFor this you can also use a non-rubbing polishing compound to get a Now we move on to the body. I start by flushing solvent through the paint cup withThis is preferably done over a can or similar container Rub the paint inlet with a cotton swab so that all paint comes of the sides of the cup. I then take a between-teeth brush, dip it in ethyl acetate, stick in into the paint channel and rotate it. It's good to stick it in all the way, since there may be paint residue behind the paint cup as well. The next picture below shows that the brush can reach into the seal that is located between the cup and the trigger. area it is easy to get a build-up of paint if you don't keep it clean, which will result in snagging of the needle (friction) and the airbrush might start to suck air backwards. It might also let paint come into the back part of he airbrush which will lead to problems and

requires a total disassembly and cleaning to fix. thoroughly until no more paint comes out on the bristles of the brush. When the body is cleaned the needle can be insertedKeep in mind to always insert it from back to front as we Time for the front end. Make sure the cap is clean on the inside and cleanse it with the dental brush. Paint seldom stick in here since this is the airThe paint goes through the nozzle. If the protective crown is dirty you can easily get at the paint with the same brush. Now to the most tricky part - the nozzle. important to keep the nozzle clean. If the nozzle is clogged, even partially, the airbrush won't work well. However, it is a delicate part. Be careful not to The Evolution has a quite large nozzle compared to many older airbrushes, which may have very small nozzles that can easily get lost orThe between-teeth brush will work well here too, but it won't reach into the tip of the nozzle.
To clean the very tip of the nozzle, one trick is to roll up some tissue paper into a tin point and twirl it into the opening. You can reach a little further this way and when you get the hang of it, you can get the paper all the way Another way is to use a thin copper wire (not steel, steel is to hard and might damage the nozzle), or a cleaning needle (sold in airbrush cleaning kits). A word of warning though for those since they can damage the nozzle seriously if you are not very careful. For example, carving too hard with a cleaning needle (the ones I saw had a square cross section), may carve away the metal in the nozzle, destroying its qualities in no time. Believe me, I've tried! After having wrecked a nozzle this way I switched to cleaning the nozzle the chemical way instead. Pure ethyl acetate or real paint thinner works well even on dried paint. I flush it through the nozzle with a pipette by pressing the tip of the pipette to the back of the nozzle and