luminess airbrush cleaning instructions

NEW CUSTOMER OR SIGNED-UP IN STORE? *By creating an account you agree to Luminess Air's Conditions of use and Privacy Notice. news, special offers and promotions from Luminess Air via email.Tip-Top Airbrush Cleaning Solution Introducing our Tip-Top Airbrush Cleaning Solution specifically formulated to thoroughly clean your Luminess Air and Luminess Tanning stylus. Our Cleaning Solution effectively doubles the life of your stylus while preventing residue buildup and clogging. It also is environmentally friendly and has a light citrus smell. Standard Shipping: $7.95 (Free Shipping order over $50) Current Estimated Shipping Timeframe (2-3 weeks) Current Estimated Shipping Timeframe (2 Business Days) Current Estimated Shipping Timeframe (1 Business Day) All 2-day and Overnight shipping timeframes apply to business days ONLY (Monday - Friday) and must be placed before 2:00 p.m. Central Time.I cleaned my airbrush with water and could still see makeup.

I put a few drops of this and could not believe how much better it cleaned! Just got it in the mail, so I need to try it. Works great for cleaning out all the make-up. This way the tip won't clog up. Water works good, but this works better. Cleans great..... prevents build up of makeup in styus So nice to know my air brush is cleaned thoroughly, with this solution, after using it. When I took the brush apart to clean completely, the needle only needed to be wiped carefully, once. The cleaning solution makes it very easy to clean i never have trouble with my stylus clogging i had mine for about 2years works like new every use!! Great cleaning product for the stylus other than just the water..... The cleaning solution works very well and the Sun Kissed SK6 is my perfect shade. I also like the matte bronze and the rose blush! I use this to clean my machine and it really works great. This keeps my system so clean, it's awesome.Easy to use, With just plain water I really wasn't sure I was getting my stylus completely clean but I can tell the difference
Once I started to clean it with the solution Works great for deep cleaning. Super easy to use it cleans so wellPeriodic Airbrush Maintenance and Parts (Airbrush Cleaning and Lubricating)
ionic air purifier breeze To order airbrush parts click here: Order Parts
air duct cleaning adrian mi Periodic Maintenance (Cleaning and Lubricating)
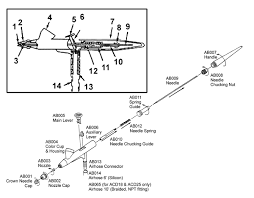
air duct cleaning el dorado hills ca For your convenience we have put together a diagram with step-by-step instructions for your airbrush maintenance. Please study the diagram for parts recognition and follow the step-by-step instructions on how to disassemble and assemble the airbrush. In each of the step of the disassembly, refer tot he diagram. Remove each part by turning or pulling in the direction indicated by the arrows.

STEP 1: Pull air hose off the hose connector. STEP 2: Remove (7) handle be turning counter clockwise. STEP 3: Loosen (8) needle chuck nut. STEP 4: Pull (9) needle out. Be careful not to damage the point. STEP 5: Unscrew (11) spring guide. STEP 6: Remove (12) needle spring and (10) needle chucking guide respectively. STEP 7: Remove (5) main lever by pulling then twisting and (6) auxiliary lever by twisting then pulling. STEP 8: Remove (1) crown needle cap and (2) nozzle cap respectively STEP 9: Using the small flat wrench received with the airbrush, remove (3) nozzle. Note: The nozzle has two flat spots. Place the slot of the wrench over these slots and turn counter clockwise. STEP 1: STEP 2: STEP 3: STEP 4: STEP 5: STEP 6: STEP 7: STEP 8: THE POWER OF AIRBRUSH MAKEUP Discover the world of Airbrush Makeup We are thrilled to introduce you to the unlimited possibilities of Airbrush Cosmetics. Get the coverage you deserve without the heavy cakeyness associated with traditional
Luminess Airbrush Makeup is designed to dramatically minimize the imperfections of lines, texture and pores for the trademark "Airbrush picture-perfect look". Color Match with Luminess Airbrush Kit Our Luminess Airbrush Makeup kits deliver superior spot-on color-match for the ultimate look of custom perfection tailor made to you. Looking flawless has never been easier, faster or more fun!My relationship with my airbrush has not always been an easy one. My first attempt went well, but after that it was all downhill. A few years and several guns later, I’m finally have a better understanding of how my machine works, and what went wrong all the times before. Most of my beginner airbrushing woes were the result of two things, the improper care and cleaning of my equipment, and not being able to reassemble a gun once I had taken it apart. So, when I ran across this amazing breakdown by Laura, of Cadillac Cookies, I begged her to share. I hope it helps others to avoid the frustration of my early airbrushing days.

Be good to your airbrush, and your airbrush will be good to you. I learned the hard way just how true this is. After a frustrating day of colors spitting and spattering on my cookies, I learned that if I wanted to continue airbrushing cookies, I would actually have to maintain my airbrush. Now, I’m a stickler for cleaning my airbrush immediately after use. In between colors, I rinse out the color cup with warm water and spray until clear. And once I’m finished airbrushing (or after using sheens), I clean my airbrush with warm water and a clear ethanol like Vodka or Everclear using The Bearfoot Baker’s method. Regular cleaning is good, but to really keep my airbrush in tip top shape, I take it completely apart and give it a deep cleaning once a week. Before you freak out, most people (as long as you’re not having problems with clogging or spitting) will only need to do this about once a month. But because I use my airbrush five to six days a week, I do it more often.

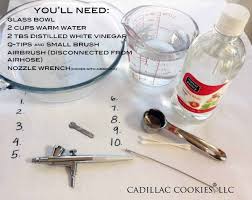
Cleaning your airbrush might seem complicated at first, but once you know the basics, you don’t need a mechanical engineering degree to do it. First, mix two tablespoons of white distilled vinegar with two cups warm distilled water (tap water is ok if you don’t have hard water) in a glass bowl and set aside. You can also use premixed airbrush cleaner, but be sure not to use any products that contain ammonia. It will corrode the brass parts & cause a funky build up. Before taking apart your airbrush, make sure it is disconnected from the air hose. You’ll want to work on a flat, clean, light colored surface. Some of these pieces are itty bitty, and can be hard to find if you drop them (trust me). I use a white pillow case that I’ve numbered from one to ten. It’s washable and the labeling helps me keep the parts in the same order that I removed them in. I just spread that over my work table, and it makes the process go much more smoothly. Note: I’m demonstrating with a Duff airbrush, but all gravity feed airbrushes are essentially the same.

The only difference between cleaning the Duff and KopyKake airbrushes is that the trigger/main lever can be removed from the KopyKake model. Now, for the fun…disassemble the airbrush in the order below. Here are some very brief instructions. Keep in mind there are a few different approaches, this is just my preference. 1. Unscrew needle cap 2. Unscrew nozzle cap 3. Use wrench to loosen and remove nozzle 5. Unscrew needle chucking nut 6. Very carefully remove needle, by pulling it out, towards the back. Sometimes, you might need to twist it a tad. 7. Unscrew spring guide. The threading is long, so it might take a while. 9. Pull out needle chucking guide 10. Remove auxiliary lever, by twisting 90º and pulling straight out. Have you ever wondered what all of these parts are called? No worries, I’ve labeled them just for you! That’s a mouth full, right? Once you’ve disassembled your airbrush, you’re ready to clean it. It’s amazing all of the color build up you don’t see until you take it apart.

Keep in mind, it’s best not to let your airbrush parts soak overnight. It will not ruin your airbrush, but it can completely remove the lubrication that allows the airbrush to work smoothly. So, now that your airbrush parts are sparkly clean (and dry), you’re probably wondering how in the heck to put it back together. Once you get past the first step, it’s super easy! Here’s a quick peek at the order that they go back together, To assemble, follow the instructions below: After you’ve replaced and tightened the spring guide (Step 4), double check your trigger. Pull it back and make sure it’s not too loose. If it feels too loose, then you’ve not tightened the spring guide enough.Your airbrush is clean! Here’s a before and after. You can really see the difference. Before you go, here are some tips and additional troubleshooting. If you have any other questions, feel free to ask in the comment section below. Airbrush sprays without pulling the trigger:

Make sure needle is in all the way–remove handle, remove nut, gently pull needle back about an inch or two, then very gently push needle back in to the very end. Tightly Replace chucking nut, and then handle. It’s ok for air to be coming out, not color unless pulling the trigger The trigger is loose or does not have any resistance when pulled: The spring guide is not properly tightened. See steps two though four above. The trigger is stuck, or has too much resistance when pulled: There are several possibilities. This includes improper assembly, mineral buildup (use distilled water for cleaning to prevent this), or loss of lubrication from repeated cleanings. To re-lubricate your gun, use a clean cotton towel to apply a light cooking oil such as EVOO or food-grade sanitary lubricant the moving parts of the gun. This includes the auxiliary lever, needle chucking guide, spring guide, and the portion of the needle that slides when the trigger is pulled. Airbrushing with pearl sheens or white: