rsd air cleaner sportster

Switch to List View Roland Sands (RSD) Turbine Air Cleaner - Black Ops - Harley Davidson Twin Cam and EVO Models (93... Roland Sands (RSD) Chrome Speed 7 Venturi Air Cleaner - Harley Davidson FL Touring (08 -Up) Roland Sands (RSD) Venturi Air Cleaner - Nostalgia - Chrome - Harley Davidson FL Models (08- Up) Roland Sands (RSD) Blunt Air Cleaner (Split Style) (Machine Ops Finish)- Harley Davidson Twin Cam... Roland Sands (RSD) Blunt Split Air Cleaner (Chrome)- Harley Davidson Softail/ Dyna/ FL W/ Delphi ... Roland Sands (RSD) Clarity Air Cleaner - Contrast Cut - Harley Davidson FL Models WithThrottle By... Roland Sands (RSD) Turbine Air Cleaner - Black Anodized - Harley Davidson XL Sportster (91 - 11) Roland Sands (RSD) Turbine Air Cleaner - Black Ops - Harley Davidson FL Touring Models W/ Throttl... Roland Sands (RSD) Clarity Air Cleaner - Chrome - Harley DavidsonTwin Cam and EVO Models (93-Up) Roland Sands (RSD) Nostalgia Venturi Air Cleaner Machine Ops- Harley Softail (01-14)/Dyna (04-14)...

Roland Sands (RSD) Venturi Air Cleaner Boss - Contrast Cut - Harley Davidson FL Models With Throt... Roland Sands (RSD) Blunt Radial Air Cleaner (Contrast Cut)- Harley Davidson XL Sportster Models W... Roland Sands (RSD) Venturi Delmar Air Cleaner (Chrome)- Harley Davidson XL Sportster Models (91- 14) Roland Sands (RSD) Blunt Power Air Cleaner (Contrast Cut)- Harley Davidson XL Sportster Models W/... Roland Sands (RSD) Venturi Air Cleaner Turbo - Contrast Cut - Harley Davidson XL Sportster Models... Roland Sands (RSD) Blunt Radial Air Cleaner (Machine Ops)- Harley Davidson XL Sportster Models W/... Roland Sands (RSD) Blunt Radial Air Cleaner (Machine Ops)- Harley Davidson FLT and FLT Trike Mode... Roland Sands (RSD) Contrast Cut Ronin Venturi Air Cleaner - Harley Davidson Softail/ Dyna/ FLT/ B... Roland Sands (RSD) Blunt Split Air Cleaner (Black Ops)- Harley Davidson Softail/ Dyna/ FL W/ Delp... Roland Sands (RSD) Turbine Air Cleaner - Black Anodized - Harley Davidson FL Touring Models W/ Th...

Tips for Choosing New Parts & Accessories for Indian Motorcycles Now that you have your new Indian motorcycle find out which aftermarket parts are available for your 2014 Chief and Chieftain models....
ionic pro turbo air purifier instructions K&N Air Filters and Aftermarket Air Kits
edible airbrush cleaner Improve performance for your motorcycle with K&N air filters and aftermarket air cleaner kits from Arlen Ness, Kuryakyn and more....
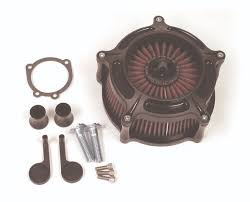
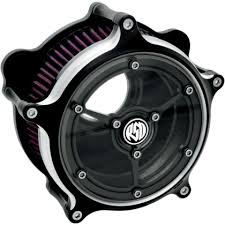
f100 whole house media air cleaner review View More Guides & Videos >>Laser Etched Black Anodized Cover, Black Anodized Backing Plate and Mounting Hardware. Carbon Fiber Ergo Trimmed K&N Filter. Powder Coated Inlet Adaptor. within 1 day, arriving up to 2 business days after the order was placed.

Revzilla offers a large selection of air cleaners, filters, elements, and velocity stacks for Harley in a wide-range of styles. Air filters for HD are typically paper, and are not always the number one choice for getting maximum performance from your machine. Helping your Sportster or Big Twin "breathe" a bit better with an air cleaner that has been specially designed for a Harley Davidson can go a long way to assist in the acquisition of additional horsepower. Oh yeah, the good stuff! If you've recently bought a fuel management product, a new air filtration system can help you get the most out of your HD engine. Spruce up your style, bring that hideous stock piece to a swap meet, and bolt up good looks and rip-snortin' performance today! IP address: 54.189.37.104Time: 2016-09-24T10:54:38ZURL: http://www.youtube.lu/watch%3Fv%3DMdYvSnNFtP0%26feature%3DrelmfuSportster has been in continuous production since 1957. During its 57-year run, the versatile motorcycle has become a favorite platform for customization, from café racer to street tracker, chopper to bobber.

Heralded motojournalist and 1977 Daytona 200 winner Cook Neilson shared a wonderful story about how the Harley Sportster was his favorite motorcycle of all time, saying he used his for just about everything, from touring the country to converting into a full-blown 160-mph drag bike. So when we recently got a chance to pick up a 2004 Sportster 1200 Custom to use as a project bike, we jumped on it. Admittedly, the bike had seen some wear. It barked and sputtered to life, you had to be on the throttle to keep it from choking out, and it had been kept outside. It had rusty spots and chroming on the rear wheel was peeling. The former owner rode it until giving it to his college-age son, so no telling what type of maintenance it saw. It had a cloudy old windscreen, worn leather bags, highway bars and leather tassles hanging from the handlebar levers. But there was something about it. With its narrow frame, it is a fairly lithe-handling bike. Even though it barked and spat, the power was there.
Both the frame and engine appeared to be in good shape. It definitely needed some TLC, but the bike had potential. The 2004 Sportster was the first with the rubber-mounted engine and we liked that it was still carb-fed. It had all the makings of a great project bike, so we scooped it up with the intentions of putting more “sport” into the Sportster equation. With that in mind, we did what just about every cruiser rider does first – swap out the exhaust! The former owner had already ditched the stock pipes for a set of Harley Screamin’ Eagle II Sportster pipes, but we don’t know how long they Here’s a peek at our 2004 Sportster 1200 Custom before the process began to turn it more into a fire-breathing street tracker. We’re tearing stuff off and trimming things down on our 2004 Harley Sportster project bike. The first thing we did was swap out forward for mid-controls and throw on new pipes, in this case, Vance & Hines RSD Slant Exhaust. Yep, the old pipes on our Sportster project bike have seen better days.
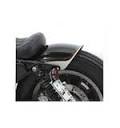
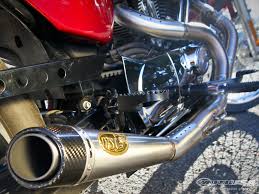
Blueing and rust gotta go. During the install, the Sportster’s drive belt cover has to be removed and the rear brake rod disconnected. The small bracket on the drive belt cover is removed and won’t be reused. had been on there. We do know they put out a good bark, but like the bike itself, were beginning to show the signs of neglect. Once we got them off, we noticed a big dent in the bottom of the front header pipe where it looks like somebody plowed into a curb or rock. Needless to say, it was time to spruce this thing up a bit. So we opted to throw on a set of Vance & Hines RSD Slant Exhaust. Vance & Hines and Roland Sands Design collaborated on the design and construction of these pipes, and with Roland’s penchant for speed, the stainless steel pipes have race-driven appeal. The 2-into-1 pipes have exposed welds for a Works-style look. The carbon and stainless exhaust tips are slash cut while the small heat shields are drilled-out. We went with a set in raw finish to inject our street tracker with a little attitude.

One item of note before we dig into the install. We knew the Vance & Hines RSD Slant Exhaust fit Sportsters from 2004 – 2013. But we’re guilty of not reading the fine print. We didn’t realize that they’re not compatible with forward controls, which our 1200 Custom sported. That’s where Craigslist comes in handy. We wanted to swap out foot controls anyways, desiring a sportier riding position with the rider tucked more into the bike. So we scored a set of 2007 Nightster controls in black for $50, and had the guy bundle in a drilled-out chain guard and turn signals in black housings for an extra $25 bucks. So while we were throwing the pipes on, we swapped out the foot controls as well. Removal of the stock pipes is fairly straight forward. We loosened up the heat shield clamps on both pipes to make it easier to get to the head pipe mounting nuts. After removing the nuts from the cylinder, we disconnected the pipes from the mounting brackets as well and pulled them off.

The stock bracket supporting the pipes is a beast, so it came off as well, as did the small bracket on the drive belt cover. We did save the three mounting bolts and washers for use with the new mounting bracket in the Vance & Hines RSD Slant Exhaust kit. And it’s just as well that we switched out foot controls because the brake rod needed to be unscrewed and moved in order to get the new pipes on. We also took the exhaust port flanges and circlips off the stock pipes because they are reused as well. At this point we’re getting into the flow of the project and thought we were going to breeze through it. But we all know that’s not how it goes. When we removed the exhaust port flanges, we discovered the circlips were pitted and corroded. Even after cleaning them up, the stock retaining rings were too weathered to reuse. Of course it was a Sunday in a small town with no Harley dealer, so all work halted until we could get some new ones. A couple days later, we’re back on task.
The stock retaining rings have no holes and we didn’t have the right type of snapring pliers so it took two of us to get the circlips onto the headers, one carefully stretching the ring with the pliers while the other eased it onto the pipe by applying pressure. We slipped the old flanges on the new pipes as well. Next we put the new mounting bracket on. While the first two bolts went in smoothly, it took a little finagling to get the third lined up. After that, we re-tightened the brake rod eyelet. Connecting the heat shield to the rear header with hose clamps was our next step while the other heat shield is connected after the pipes are connected to the header. Before this, though, we went to slip in the new exhaust port gaskets that come with the kit when we realized the old ones were still wedged in place. In fact, the gasket on the front header pipe was totally shredded and frayed. No wonder the Sportster had been popping and gasping like it did. New gaskets in place, we connected the headers to the cylinder heads with the stock bolts, then slipped the muffler onto them, securing it all together with two small springs.
The muffler body was attached to the mounting bracket via two bolts, the nuts on the exhaust ports were tightened down, and the final heat shield was connected. At this point, oxygen sensors would be installed if you’re running them, but we aren’t, so we just tightened down the supplied 18mm steel plugs in the holes for the sensors. Starting the Sportster up, we’re greeted by a racier rev to the tone of the exhaust note. Simply changing out the pipes has made it sound more hot roddish, a deep burble unleashed with every twist of the grip. Best part is, now that we don’t have the air leak from the worn gasket, it’s not as Now that’s what we’re talking about. With the Vance & Hines RSD Exhaust on our ’04 Sportster project bike, it’s already looking and running a little racier. choppy at idle any more. Getting on the gas, the new pipes are noticeable across the board, cleaning up low end hesitation, smoothing out the power band and improving roll-on. It also eliminated the popping and coughing we were experiencing on decel.
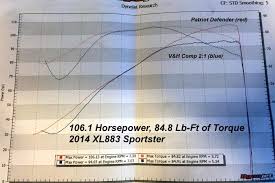
Taking it over to our friends at Hansen’s BMW Triumph Ducati, we threw the Sporster on their Dynojet where the 1200 Custom put out 72.38 lb-ft of torque at 3900 and 60.63 hp @ 4900 rpm. The heart of the powerband is between 3500 – 4300 rpm as the bike is constantly above 70 lb-ft in that range. Taking off the stock mounting bracket and old pipes helped shed a few pounds as well. Now the bike looks, sounds, and runs a little more like the hot rod we’re hoping for. But it is running rich. We can smell it and noticed a little grey smoke coming out during dyno runs. Vance & Hines recommends using a Fuelpak Fuel Management System with the pipes, but our bike is carb-fed so that won’t work for us. We know the air/fuel ratio is off, but we have an RSD Clarity Air Cleaner to slap on as well, so we want to get the new intake on and see what effect the new air flow has. After that, we’ll get the carb dialed in for the new arrangement and get some more numbers because we know the combination should bump up power all the way around.