s&s airstream air cleaner cover

Shipping CostCustomer ReviewsRV Products Ask a questionColeman MACH 3+ 13500 btu Air Conditioner Upper Unit* 2 Year Factory Warranty. The Coleman®-Mach® 3 PLUS™ is one of the best RV air conditioning values available. It features a large evaporator and condenser coils with raised lance fins to help dissipate heat, has a solid 13,500 nominal BTU cooling capacity, and delivers 320 CFM (cubic feet per minute) airflow. You can count on the Mach 3 PLUS™ for reliability. All-copper tubing and gas-flux brazed joints ensure durability and long life for your RV air conditioner. Add the optional Heater Assembly, and you’ll have 5,600 BTUs of heat for cool-weather outings. Full load amps:14.9 Cooling, 16 Heating w/Optional heat Strip Weighs just 108 lbs. 115 Volts AC power 2 years parts and labor warranty...be sure and send in the warranty card after the unit has been installed Easy installation into standard 14"x14" roof vent. You can count on the Mach 3 PLUS for reliability.
Add the optional Heater Assembly, and you'll have 5,600 BTUs of heat for cool-weather outings. *Does not include interior ceiling assemblyRelated Items:COLEMAN RV ROOF AIR CONDITIONER Ceiling Assembly with Heat Strip Buy NowCOLEMAN 15000 btu RV ROOF AIR CONDITIONER Buy NowColeman Air Conditioner Filters Buy NowCOLEMAN POLAR CUB RV ROOF AIR CONDITIONER Buy NowCOLEMAN POLAR CUB RV ROOF AIR CONDITIONER Top Unit Buy NowColeman RV Camper Roof Air Conditioner AC Heat Strip Add - on Buy NowAlso purchased with this product
honeywell air purifier 18200: COLEMAN RV ROOF AIR CONDITIONER Ceiling Assembly with Heat Strip COLEMAN RV ROOF AIR CONDITIONER Ceiling Assembly Cool Coleman Dometic AC Air Conditioner Universal Roof Gasket SealProduct Questions & Answers:By johnAnswer: Yes, it will work with that application.
rabbit air minusa2 air purifier reviews
The upper unit plug-in has not changed in over 20 years. It is compatible with almost all lower unitsBy tommyAnswer: On a coleman, that's all there is to it! Tuning your Harley Davidson carburetor is simpler than most think and can be performed with a few common tools. This simple procedure is a great Harley tech tip that applies to all Harley carbs from 1989 to present that use the CV style Harley Davidson carburetor.
germ guardian tabletop air purifier ac4010 reviewsEarlier models equipped with the older butterfly style carbs (pre-89 Evo’s, Shovelheads, Pans, and Ironheads) are excellent candidates for upgrading to a modern Harley carburetor. Preparing the carburetor for tuning will require removal from your Harley-Davidson’s engine but this is easily accomplished. Begin by shutting off the petcock fuel valve and starting the engine to allow all fuel within the carburetor bowl to be emptied.

Remove the aircleaner assembly including the backing plate which is attached to each head with a banjo bolt. This is a good time to inspect these bolts for obstructions in their passages. Remove the choke cable from it’s mounting bracket on the opposite side of the bike.Be sure to install a new set of spark plugs when tuning. Note: Before proceeding to rejet your carburetor it is recommended that you perform the following tuning procedure. Having the mixture properly tuned is critical to making this carburetor perform and should always be performed prior to or at the same time you rejet the carb. The choke cable can stay attached to the carburetor during this procedure, simply detach the knob end from the horm bracket. Disconnect the fuel line from the fuel inlet on the carburetor or the opposite end connected to the fuel petcock, whichever is simpler to access. The hose is likely fastened using a special crimped clamp. This may be cut or pried off to remove since you won’t be using it again.

Be sure to have a new hose clamp available. Next loosen both throttle cables from their adjusters located just beyond where they exit the throttle grip. A couple turns is usually all it takes to give you enough slack. If you count how many turns each adjuster is loosened then you can return them to the exact adjustment when reinstalling your carb. This is a good time to label each cable to avoid any confusion when reconnecting them to the carb’s throttle cam. A simple “Top” and “Bottom” should suffice when tagging each cable. Now that you have enough slack in the cables you can pull the carburetor away from the manifold. A Harley carb is only held to the manifold with a slip fit rubber manifold boot. Gently rock or twist the carb back and forth as you pull it away from the engine. Remove the cables that you tagged and remove any vacuum hoses. If your model has multiple vacuum hoses it would be a good idea to label these as well. With the carb removed, place upside down on a sturdy work surface.

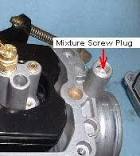
Do not remove the bowl at this point to prevent debris from entering the carburetor. Tip: To keep from drilling too far into the plug, it has been suggested to wind electrical tape around your drill bit quite a few times about 3/16? This will create a stop to keep the bit from drilling too deep. Pry the plug out using a pick or awl. You can also thread a sheet metal screw into the drilled hole and use this to pull the plug out. Now that the plug is removed clean the area around the mixture screw so no metal fragments remain. At this point there are two methods for adjusting the mixture. Adjustment Method: Using a small flat head screwdriver turn the screw clockwise until it gently seats. DO NOT OVER TIGHTEN AS THIS WILL DAMAGE THE NEEDLE SCREW. Count how many turns it takes to reach the closed position. Mark the screwdriver if needed to properly count each turn. Now turn the screw out counter clockwise stopping at a 1/4 turn beyond that which you originally counted. For example, it you turned the screw in 1-1/2 turns then unscrew it 1-3/4 turns.

This is your base starting point and alone will allow your idle mixture to be slightly richer than the factory’s EPA setting. In many cases this will be the ideal setting. As an alternative to adjusting the mixture screw with a screwdriver, many prefer using an EZ-Just mixture screw to ease adjustments and fine tuning. If the mixture screw has been reset by the dealer or previous owner (evident by the plug already being removed), turn the screw clockwise until it seats. Now turn the screw outward 2 turns to establish a starting point. The same procedure applies if using an EZ-Just screw. While the carburetor is off it is a good time to inspect the vacuum slide. The slide should move up and down freely. A gradual closing action is acceptable but should not hang up or stutter as it closes. If the slide hangs or has trouble returning to a closed position further inspection or replacement may be required. Reinstall the carburetor back on your bike by reversing the steps taken during removal.

Be sure to replace the fuel hose clamp and vacuum lines. It may be a matter of dexterity but I prefer to install the cables before pushing the carb back onto the manifold. Make certain the carb firmly seats back onto the manifold boot. Test the throttle for binding and smooth operation. Double check each hose and connection. The air cleaner assembly MUST be installed prior to starting the engine, not only to hold the carburetor in place but to prevent having the carb backfire in your face while tuning. Start the engine as normal and bring up to operating temperature prior to fine tuning. Let the bike idle for no more than 5 minutes. The modified carburetor should allow your bike to run well enough for a mild test run around the block to speed up the warm-up process. With the engine warmed up and at idle you may now fine tune the idle mixture screw for optimal performance. Acquainting yourself with the adjustment screw location at the bottom rear of the carburetor prior to running the engine is advised, which also prevents burning your hands.

You will need a small screw driver for adjusting the screw unless an EZ-Just has been installed. With the engine idling slow (no more than 900 rpm), turn the screw inward (clockwise) SLOWLY until the engine starts to stumble. You are working with the screw upside down so check to make sure you are turning the screw clockwise or inward. Note: Be careful NOT to allow the mixture screw to fall out as there is a very small spring, washer, and o-ring that will fall out as well. These items known as the mixture screw packing kit are not available from the dealer or manufacturer, however if you should lose these parts there is an aftermarket replacement kit available here. If the engine will not idle on its own during this procedure, adjust the idle set screw on the throttle side of the carburetor until it idles correctly. Now turn the mixture screw outwards (counter-clockwise) until the engine begins to run smoothly, then add 1/8 of a turn. Maintain proper idle speed and repeat the adjustment each time you adjust the idle speed.

Blip the throttle a couple of times and observe the results. If the engine responds quickly with a smooth blast and no backfiring through the carburetor, you have your idle mixture right. If backfiring occurs through the carburetor then adjust the idle mixture screw out another 1/8 turn. Normally, the mixture screw should only require 2 to 3 turns. Anything above 4 turns indicates the pilot jet is too small. /* harley-performance 300 */ Optimal setting on most Harley’s is approximately 1/4 turn clockwise when backed out from the point of backfiring (coughing).Take your newly tuned bike for a ride and note how it idles and responds off idle. If you experience any coughing through the carburetor, adjust the mixture out another 1/8 of a turn.Black smoke seen from the exhaust at idle or a feeling of sluggishness off idle indicates you may have set the mixture too rich. If your bike is now idling steady and responds well from a start then you are all set. If your engine still runs lean you should move on to rejetting your carburetor.