sharper image air purifier repair

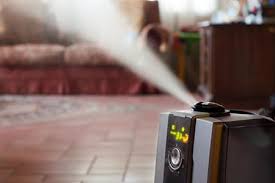
Humidifiers are handy appliances to have in a home, and like any other appliance, they require regular cleaning. If your humidifier is being used on a daily basis, then it should be cleaned at least once a week to maintain optimum performance. Always refer to the cleaning instructions provided by the manufacturer for any appliance. Before following the instructions included here, check with the manual for your humidifier to ensure these cleaning instructions are compatible with your machine. Always unplug the humidifier before attempting any maintenance or cleaning. Cool mist humidifiers have basic steps for cleaning them. After you've unplugged the cool mist humidifier, remove the filter and place it to the side. Next, remove the mineral buildup following the directions included below. Next, disinfect the humidifier using the directions included below. Finally, replace the humidifier's filter properly. Warm mist humidifiers need to have their mineral build up removed using the directions provided below.

Unplug the humidifier first. Next, it is important that you clean the heating element. Pour white vinegar into the base of your warm mist humidifier. Place the misting chamber into the base. Allow the vinegar to sit and soak for at least half an hour. Remove the unit and using a soft bristled brush, gently brush away the mineral deposits from the coils. Never use a metal brush. Never pick at the deposits with a tool or sharp object. A clean toothbrush can be used to brush the deposits away from the coil. Next, pour cool, clean water into the base and place the misting chamber into it. Allow the chamber to sit for a few minutes to allow the residue to soak off. Wipe the chamber clean and dry with a clean, soft cloth. Carefully pour the remaining water down the drain. Finally, disinfect the warm mist humidifier using the directions included below. Both the cool mist and warm mist humidifiers require removing the mineral buildup. To remove the mineral buildup, pour approximately one cup or 8 ounces of undiluted white vinegar into the base of the water holding receptacle.

Allow the vinegar to sit and soak in the humidifier for at least one half hour. Redistribute the vinegar occasionally by gently shaking the holding receptacle. Swish the solution around the container making sure that it coats the entire base. Additionally, use a soft bristled brush to gently scrub the interior of the container. Repeat the scrubbing process a second time on areas that appear to be encrusted with a mineral build up. Once the half hour has passed, slowly pour the vinegar from the holding receptacle.
quiet air purifier singaporeRinse it thoroughly with clean water to remove the mineral and vinegar residue.
holmes air purifier reviews amazonRinse the container a second time to ensure that you have removed all of the residue.
holmes air purifier reviews egg
Disinfecting the Humidifier Once you have cleaned the humidifier, you should disinfect it. One method of disinfecting is as follows. Fill the holding receptacle or base with clean water, making sure that you know how approximately much water you are using. Next, add one teaspoon of liquid chlorine bleach to every gallon of water that you have in the base. Allow this solution to sit and soak for at least half an hour. Occasionally, gently swish the solution to coat the base evenly. Once the half hour has passed, pour the bleach solution down the drain, being careful not to spill any. Rinse the base several times until the smell of bleach has dissipated. Remember when you are cleaning your humidifier to unplug it. Also, avoid commercial cleaners as they are unnecessary. Never allow any vinegar residue to remain in your humidifier. Looking to purchase a new humidifier? Check out our Humidifiers Buyer's Guide. ScanX delivers crisp, sharp images in up to 18 lp/mm true resolution, meeting the needs of all diagnostic requirements.
Capture all areas of your patient’s anatomy thanks to ScanX PSPs that have a 100% active surface area. This means you capture up to nearly 40% more anatomy than with the comparable sized wired sensor. Once a PSP has been inserted into ScanX, the sharp, crisp image appears on your screen in seconds. Your digital images are ready to be reviewed, shared, archived or emailed. ScanX PSPs are 30 times thinner then wired sensors; flexible, with rounded corners that provide optimum comfort for your patients. You, your patients and staff are all protected by ScanX barrier envelopes that 100% hygienically seal each PSP. A film-like workflow will enable your staff to confidently start using ScanX with virtually no learning curve and will result in fewer retakes. The thin, wireless PSPs are durable and immediately ready to be used again thanks to the automatic read and erase technology. ScanX is the most economical digital solution for any practice. Easily installed, it will work with your existing X-Ray system, AC or DC.

Eliminate the hassle and maintenance cost of the film processor and all of its chemicals. The durable PSPs require no annual maintenance fees or costly insurance and can be reused hundreds of times. TAKE ADVANTAGE OF THE INCREASED DEDUCTION LIMIT FOR SECTION 179 You may deduct the full cost of dental equipment from your 2016 taxes up to $500,000. Please consult with your tax advisor for further information. ScanX - Digital Imaging Without Limits 51 lbs. (23.1 Kg) Universal 100 to 240V, 50/60 Hz Up to 18 lp/mm (900 dpi) Depending on scanning mode/pixel size selected 40 lp/mm (2000 dpi) Class I Laser Product, Compliance with FDA HHS 21 CFR 1040.10 and IEC 60825-1 Scanning Track/ PSP Sizes 0, 1, 2, 3, 4. Panoramic sizes 5"x12" and 6"x12" (15cm x 30cm). power supply and cord; 4 each size 2 PSP guides; 1 each size 0, 1, and 3 PSP guides; 18 each size 2 PSPs + 2 size #0 plates; 300 size #2 + 100 size #0 barrier envelopes; 1 transfer box for transporting exposed intraoral PSPs.
Pentium-4, 2 GHz or higher Windows XP Professional with Service Pack 3 or later for an Intel 32-bit processor; Microsoft Windows XP Professional 64-bit Edition with Service Pack 2 or later for an Intel 64-bit extended (x64) processor; Microsoft Windows Vista Business, Enterprise, or Ultimate with Service Pack 2 or later for an Intel 32-bit or an Intel 64-bit extended (x64) processor; Microsoft Windows 7 Professional, Enterprise, or Ultimate with Service Pack 1 for an Intel 32-bit or an Intel 64-bit extended (x64) processor; or Microsoft Windows 8 Professional or Enterprise for an Intel 32-bit or an Intel 64-bit extended (x64) processor. 500 GB (200 MB disk space required to start scanning) SVGA 24", 1280x1024 or higher resolution USB 2.0 or later VISIX® is easy to learn and easy to use. Barrier Envelopes by Air Techniques minimize cross-contamination and infection of intraoral PSPs. Air Techniques has specially formulated PSP Cleaning Wipes for all of your intraoral and extraoral phosphor storage plates (PSPs) and plate protectors.