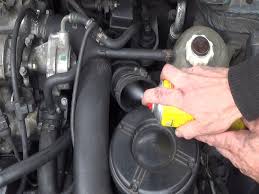
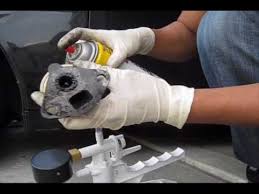
spray carb cleaner into egr valve

Expert ReviewedHow to Clean Your EGR Valve Two Methods:To Clean A Mechanical EGR ValveTo Clean An Electronic EGR ValveCommunity Q&A Since the 1960s, vehicle manufacturers have installed Exhaust Gas Recirculation (EGR) valves to reduce nitrous oxide (NOX) emissions. The EGR valve recirculates a small amount of exhaust into the combustion cycle. The warmth of the exhaust lets the combustion chambers warm up quickly, while the spent, inert gases keep the chambers from getting too hot when the engine fully warms up. Whether mechanical or electronic, EGR valves open and close to control the gas flow. If left open, the excess vacuum will cause the engine to act like it wants to stall, idling roughly or surging. If the valve stays closed, detonation could occur in the combustion chambers; this knocking or pinging will lower mileage and the lifespan of the engine. To smooth a rough idle, or hesitant or surging acceleration, and reduce knocking, clean your EGR valve. Clean and inspect the vacuum hose.
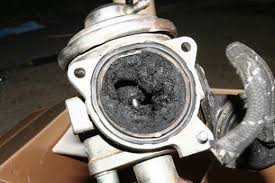
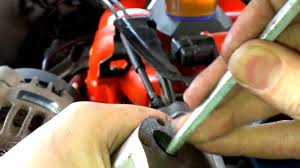
Inspect the EGR valve for damage. Clean the return tube and gas entry port. Use carburetor cleaner and a small-bristled brush like a wire brush, toothbrush or pipe cleaner to clean off the carbon from the metal exhaust gas return tube and the gas entry port on the valve (usually the smaller hole with a spring-loaded pin, or “pintle”). If there is a lot of carbon build up around the EGR valve, you may also want to just save yourself some time and replace it with a new one. Clean out the entry port. Reinstall the EGR valve. Disconnect the negative battery cable. Disengage and remove any sensors and electrical connections along with any hoses. Loosen the bolts to remove the EGR valve and gasket. Check the hoses and gasket for wear, to replace or reuse. Spray the valve and hoses with carburetor cleaner, using a brush to clean off the carbon buildup out of any hoses and small hole with the pintle. Reinstall the EGR valve using the gasket and bolts, and reconnect the electrical connections and sensors with any hoses.
Reconnect the negative battery terminal.
air duct cleaning sic code Whether spraying or soaking the valve, if you intend to reuse the gasket, keep it clean and dry, as the cleaner may damage the gasket.
b3 air rifle cleaning kit If you can separate the EGR valve from all other assembly pieces (hoses or electronic connections), you may opt to soak the valve in carburetor cleaner rather than spraying it to ensure any carbon buildup is loosened and washed out inside and out.
review holmes hepa air purifier Simply replacing the EGR valve instead of cleaning it may save you a lot of time and frustration. Read your owner's manual for specific maintenance schedules, but you can generally inspect your EGR valve every 12,000 to 15,000 miles (19,000 to 24,000 km).
If you clean your EGR valve and it seems to get clogged sooner, have your mechanic run a diagnostic. Your engine may need a more thorough tune-up to be creating so much carbon so quickly. Inspect and replace the EGR valve while outdoors, or in a well-ventilated area, to reduce exposure to fumes from the carburetor cleaner or exhaust.Cleaning your EGR valve will solve your car's engine performance issues related to any clogging or system passages problem with the valve. Even more importantly, it'll prevent serious engine damage and expensive repairs.During operation, the EGR system pulls a small amount of exhaust gases from the exhaust manifold through the EGR valve, into the intake manifold, and back into the combustion chambers. Theses gases mix with the air-fuel mixture inside the cylinders to reduce high temperatures during the combustion process. The lowered temperature inhibits the formation of poisonous oxides of nitrogen (NOx). Overtime, though, this routed gases build up a hard and thick wall of carbon, locking the EGR valve opened or closed and obstructing system passages, which prevents exhaust gases from reaching the combustion chambers and increases NOx emissions.
You may recognize some of these bad EGR valve symptoms: If the valve sticks open, a continuous flow of exhaust gases enters the cylinders, disrupting the combustion process. The engine idles erratically, surges, and even stalls as it warms up or as you drive at low speeds—inside parking lots for example. If the valve sticks closed or passages become clogged, cylinders temperatures will increase, leading to a knocking condition (fuel ignites before the combustion)—you'll notice a tapping noise coming from the engine. In severe cases, this develops into violent detonations that will seriously damage your engine. On newer car models with electronic valves, the vehicle's computer will trigger the Check Engine light or MIL (malfunction indicator light) when EGR system problems develop. That's why car manufacturers recommend cleaning the EGR valve and passages every 50,000 miles or fewer. But you don't need to take your car to the shop. Clean the EGR valve and passages over the weekend at home using a few common tools and a quality EGR valve cleaner.
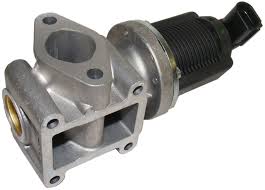
By the end of your repair, you'll have restored engine performance and saved your engine—and your wallet—from irreversible damage. Finding the EGR Valve Depending on your car's make and model, your engine may be using one of three common types of EGR valves: vacuum controlled (older models), electronic-vacuum controlled valve (newer models), or the new electronic controlled digital valve. You'll locate the valve towards the top or side of the engine. However, one or more components may obstruct your view. Older vehicle models use a semi-flat, round thick metal disc about three inches in diameter. You'll see a thin vacuum hose connected on top. Newer models use a similar valve with a small box (sensor) on top along with an electrical harness. Still other models use a cylinder or block configuration for the valve with attached sensors and an electrical harness. Look around the side of the cylinder head (top area of the engine) for the valve. Check near the throttle body, firewall, or intake manifold.

If you don't see it, search for your EGR valve online by going to an auto parts store website and entering your car's make, model and engine size to look for the valve. Most auto parts stores will show the picture of the EGR valve that applies to a particular vehicle make and model for quick identification. Look at the picture and you'll know exactly what you're looking for.Or, better yet, consult the repair manual for your particular vehicle make and model. You can buy an inexpensive aftermarket repair manual at most auto parts stores and online. The manual tells you not only the location but provides illustrations and photos of the valve and related components, troubleshooting procedures, and the necessary steps to remove and replace EGR system components like the EGR sensor, vacuum hoses, and pipes. Removing the EGR ValveAfter locating the valve and moving accessories out of the way to gain access to it, it's time to remove it. Some valves have a thin vacuum hose attached to it.

Carefully disconnect the hose from the valve. Check the vacuum hose for splits, softening, hardening, or cracks. If necessary, replace it. Damaged vacuum hoses cause poor EGR valve operation and EGR system failure. Follow the vacuum hose you just disconnected to the component attached at the other end, and inspect any other hoses connected to that other component as well, if any. Unplug any electrical connectors from the valve. Using a ratchet, extension, and socket, remove the valve mounting bolts. You'll need to unscrew two to four bolts, depending on your particular model. Also, your valve may connect to a pipe coming from the exhaust manifold. To remove the pipe, use an adjustable or crescent wrench or disconnect the pipe at the exhaust manifold. After removing the EGR valve, check the valve's gasket(s). If it still looks in good shape, recycle it. Otherwise, buy a new one. Some auto-parts stores only sell the gasket as part of a new EGR valve. Yet, you can buy gasket paper and make your own.

Save the remaining paper for other gaskets you'll need in future repairs. EGR Valve CleaningPut on your safety glasses and acid-resistant gloves, you're going to remove carbon deposits from the surface, entry and exit ports on the valve, and corresponding intake and exhaust ports and pipe. Spray carbon deposits with EGR-valve or carburetor cleaner. Immediately wipe cleaner off plastic parts and electrical components still attached to the valve to prevent damage. Use a dull scraper and a pipe cleaning brush to scrub carbon buildup. Then use a soft brush to remove the carbon and wipe the surface using a clean rag. Repeat the process as necessary. And don't gouge mounting and sealing surfaces, or you'll cause exhaust gases to leak. To deal with rock-hard buildup, leave the valve soaking in the cleaning solution for a few minutes. Just don't let the cleaner touch electronics, electrical components, or plastic parts, or you'll ruin the valve. Repeat step 3 to fight stubborn carbon deposits.

Some people leave the valve soaking in the cleaning solution overnight, but fumes emanating from the strong chemicals in the cleaner gradually destroy sensitive valve parts, so do it at your own risk. If you know carbon deposits remain inside the intake manifold, apply the EGR valve cleaner through the intake manifold—read the instructions on the product's package. This will also help remove carbon from the intake valves. Seafoam is another popular product for this purpose. Or, if you prefer, take your car in for a carbon cleaning service. Once you've removed all the carbon buildup and cleaned each passage and sealing surface, reassemble all the components, including the gasket. Put everything back in place and check that the symptoms have disappeared. Carbon deposits accumulate rapidly, especially if most of your driving happens within the city—going to work, driving to school, quickly running to the grocery store, and doing similar errands. This driving pattern doesn't allow the engine to reach operating temperature and run long enough to remove harmful carbon deposits.