sunbeam air purifier yellow light
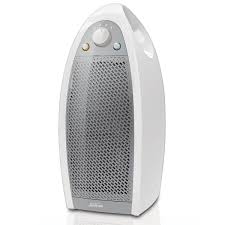
HEPA-type filter helps remove up to 99% of airborne particlesUses aer1® filter, the most effective filter technology available, enhanced with Arm & Hammer™*2 baking soda to help eliminate odoursOptional ionizer assists in particle removal3 speed settings to keep air fresh and pureFilter-life monitor alerts you when filter changes are neededRecommended for small rooms3 year limited warranty SAP8412-CN - Sunbeam® Designer Series™ Mini Tower HEPA Air Purifier, White SAP8412-CN User Manual (French) SAP8412-CN - Sunbeam® Designer Series™ Mini Tower HEPA Air Purifier, Black SAP8412B-CN User Manual (French) SAP8412-CN - Sunbeam® Designer Series Mini Tower HEPA Air Purifier SAP8412-CN User Manual (English) SAP8412-CN - Sunbeam® Designer Series Mini Tower HEPA Air Purifier SAP8412B-CN User Manual (English)Laundry Pedestal with Storage Drawer in White Filter for 5.0+ gal. RIDGID Wet Dry Vacs (2-Pack) 1-Layer Everyday Dirt Pleated Paper Filter for 5.0+ gal.

RIDGID Wet Dry Vacs 3-Layer Fine Dust Pleated Paper Filter for 5.0+ gal. Ice and Refrigerator Water Filter 1 Water Filter for GE Refrigerators (Dual Pack) Single Outlet SinkTop Switch Kit for InSinkErator Garbage Disposals Ice and Refrigerator Water Filter 4 FMS-2 Refrigerator Replacement Filter Fits Samsung HAF-CINS(2-Pack) 3-Layer Fine Dust Pleated Paper Filter for 3.0 gal. High-Efficiency Dust Bags for RIDGID 12 gal. Wet Dry Vacs (2-Pack) Laundry Pedestal with Storage Drawer in White Laundry Pedestal with Storage Drawer in Platinum PureSource Ultra Water Filter for Frigidaire Refrigerators Ice and Refrigerator Water Filter 3 Power Cord Accessory Kit for InSinkErator Garbage Disposals Laundry Pedestal with Storage Drawer in Graphite Steel GE Refrigerator Water Filter 5-Layer Allergen Filter for 5.0+ gal. FMW-5DP Refrigerator Filter Fits Whirlpool Filter 3 (Pack of 2) Aqua-Pure Plus Refrigerator Water Filter (3-Pack)

FMM-2 Refrigerator Replacement Filter Fits Whirlpool Filter 4 (Value Pack) True HEPA filtration removes up to 99.99% of airborne allergens*3 Programmable timer allows you to o turn off at your convenienceOptional ionizer assists in particle removal. patible with all aer1® filters3 Year Limited Warranty BAP9200C-CN - Bionaire® 99.99% True HEPA Tabletop Air Purifier with Claritin® Allergy Plus Filter BAP9200C-CN User Manual (English) BAP9200C-CN - Bionaire® 99.99% True HEPA Tabletop Air Purifier with Claritin® Allergy Plus Filter Instruction Manual (French) Enter Zip Code, City and State, or Store Number Locator service by Know-Where Systems Use the search form on the left to find a store. Your list is empty. Other ways to add items: Where are my lists from before? Add or remove item, see aisle locations, and manage your lists: Skip to the good part with Publix Online Easy Ordering-there's no line online and save even more time with your own Publix account: View your history or
favorite orders and add what you want to your basket in one quick click. Hurry and sign up today. Coupons for products you need are just a click away — and you can save instantly at checkout. Sign up or log in to start clicking and saving. Go to Digital Coupons Learn more about Savings at Publix.Compression, Pressure and Lighting Issues: It is a good idea at the beginning of every season to remove the pump plunger from the tank and oil the compression cup.
asthma ionic air purifierOn the end of the pump plunger assembly is a cup manufactured from black neoprene or leather and these cups need to be lubricated or soaked a good leather oil, a light machine oil (such as 3 in 1), or a non detergent 30 weight motor oil for a few minutes.
trane hepa air purifierThoroughly, lubricate the walls of the pump barrel as well.
ionic air purifier as seen on tv
Now, when the cup on the pump is re-inserted into the pump barrel, make sure the outside edged are not creased or deformed. Otherwise, it will roll away from walls of the barrel and no compression will build. If the compression cups are damaged or malformed they need to be replaced. When in use the pump plunger assembly must be turned at least one complete full turn, counter-clockwise, before pressurizing the lantern or camp stove. The air stem must be partially unscrewed from the check valve at the base of the pump barrel before any air will pass into the tank. If the pump plunger only opens a ¼ of a turn this is not enough of an opening to allow air passage inside the fuel tank. To correct this issue push the plunger down inside the tank. Next, using a pair of pliers on the outside machined edge of the silver end cap the thumb is placed over, twist the complete plunger assembly to the left. This will free the air stem located in the check assembly and air will now fully flow when pumped into the fuel tank.

Here is a test for leaks in areas that can cause compression and pressure issues. Make a soapy water solution (1 teaspoon of dish soap to ½ c. of water). Pressurize the fuel tank as normal. Then, drizzle or daub the solution around and over the fuel filler cap and over the thumb hole on the end of the pump plunger (make sure it is in the closed position). Another area to test is where the actual brass control valve is screwed into the fuel tank, if this seal is broken air will escape as well. On the camp stoves, daub the soapy solution around where the actual brass valve body screws into the top of the fuel tank. On the lanterns this connection is located under the enclosed metal band the control knob protrudes through. To access the valve area, the complete burner and/or frame assembly will need to be removed from the lantern to reveal the actual control valve. Compression and Pressure Issues caused from long term storage: If a liquid or dual fueled stove or lantern are stored for long periods of time with fuel in the tank a coating of lacquer can build up on the fuel valve system.

Sometimes this can be removed by pouring out the old fuel inside the tank, then filling it about halfway with denatured alcohol, (do not use rubbing alcohol as it has water in it, and DO NOT pump up the tank or open the fuel valve while the alcohol is in the tank. This process is for cleaning purposes in the tank only). Let the appliance sit for 24 hours then shake the tank vigorously and pour out the used alcohol into a container for proper disposal. Next, rinse the tank with a one cup of clean Coleman Fuel to remove any residual debris left behind. Pour this used fuel into a container for proper disposal as well. Fill the tank with fresh fuel and try lighting unit again. If the unit will not light the fuel pick up tube on the actual fuel valve assembly is blocked and needs to be replaced. We suggest that if you are storing your appliance for more than two weeks, pour as much fuel as possible from the tank back into the fuel can. Emptying most of the fuel from the tank through the filler hole is usually sufficient .

This will help reduce the build-up of lacquer. In order to totally empty the fuel tank, you will need to run the lantern or stove until the tank is empty and burned dry. Then, pump up the tank and store under pressure. This will help to keep the fuel lines clear. Repair solutions for these particular issues: Check Valve: If bubbles form at the end of the pump assembly on the thumb hole after it is closed to the off position, the check and valve assembly needs to be replaced. Filler Cap: If bubbles form around the around the fuel filler cap or around the center screw (used in the very old two piece filler caps) the complete filler cap needs to be replaced. Control Valve: If bubbles form in this area the valve needs to be removed counter clockwise from the fuel tank and resealed using a thread sealer called Perma-Tex #2 ( obtained from an auto parts store). When the valve has been re- installed into the fuel tank, allow to dry overnight and recheck for leaks. Compression pump cups: Damaged (chipped or torn edges) or malformed, they need to be replaced.