ultrasonic airbrush cleaner
At the beginning, take a look at the article written by Spell - How to clean a very dirty airbrush? This tutorial shows perfectly how time-consuming and difficult, cleaning the very dirty airbrush sometimes can be. I searched for a way to faster and more accurate cleaning my airbrushes. Na początek, warto zapoznać się z artykułem autorstwa Spella - How to clean a very dirty airbrush? Ten poradnik idealnie pokazuje jak pracochłonne i trudne, może być czasem czyszczenie bardzo brudnego aerografu. Poszukiwałem więc sposobu, na szybsze oraz dokładniejsze czyszczenie moich aerografów. Większość osób nie stosuje się do instrukcji obsługi zarówno myjki jak i aerografu i moczy aerograf w całości (razem z uszczelkami i zaworkiem) często kilka godzin w najgorszych rozpuszczalnikach (o których poniżej). Taka operacja kończy się uszkodzeniem wszystkich uszczelek (nawet tych teflonowych), do tego resztki farby dostają się do kanału powietrznego, często zatykając go lub częściowo dławiąc.

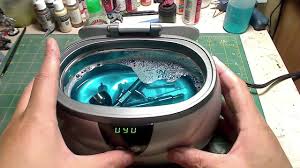
Myjka ultradźwiękowa sprawdza się tylko i wyłącznie gdy farba zaschnie całkowicie w aerografie i należy potraktować ją jako urządzenie reanimacyjne, a nie do codziennego użytku. Oczywiście podczas takiej operacji powinny zostać ściągnięte wszystkie uszczelki, a moczony powinien być tylko element z zaschniętą farbą. Czas moczenia w dedykowanym płynie do mycia aerografów należy ograniczyć do minimum. More than a year ago had been recommended to me ultrasonic cleaner. In my next, LIDL store, I bought this unit for the amount of 25EURO. The price is not excessive, and I heard about this washer very good reviews. I decided to take a chance 1 x Ultrasonic cleaning device 1 x Basket insert 1 x Curved insert for watches 1 x CD holder 1 x Operating instructions Here you can find in a PDF file. Tutaj możecie znaleźć INSTRUKCJĘ OBSŁUGI w postaci pliku PDF. Tests started by cleaning my two airbrushes. They are cleared and waiting for use.

However, I looked at them carefully. Airbrush BD-208 (Chinese K208) not quite turned out to be clean. Details can be seen on the pictures below. Testy rozpocząłem od wyczyszczenia moich dwóch aerografów. Pozornie są one wyczyszczone i czekają na użycie. Przyjrzałem się im jednak dokładnie. Airbrush BD-208 (Chinese K208) nie do końca okazał się czysty. Szczegóły widoczne są na poniższych zdjęciach. Despite regular cleaning, paint remaining in inaccessible places.
quality air duct cleaning rochester ny The hardest parts to clean (eg nozzles) placed in a small glass jar.
scarab air cleaner coversJar filled with acrylic paint cleaner.
air purifier yelpYou can use any cleaner of this type. In addition, I added the parts from my EVOLUTION into jar.

Najtrudniejsze, do wyczyszczenia części (np.: dysze) umieściłem w małym szklanym słoiczku. Słoiczek wypełniłem zmywaczem farb akrylowych. Możecie użyć dowolnego zmywacza tego typu. Dodatkowo, dorzuciłem również części od mojego EVOLUTION do słoiczka. For 10 minutes, just waiting for the end of the cleaning. This is the water after a 10 minute wash. Now parts washed only with water and dishwashing liquid. The twisting of the element and thorough wiping brush solved the problem.The two-hour session with EVOLUTION of the mini Executioner. I used only acrylic paints. Airbrush was flushed with Revell cleaner. Airbrush looked like this after painting.Dwugodzinna sesja z EVOLUTION nad figurką Executioner. Używałem wyłącznie farb akrylowych. Aerograf był przepłukiwany zmywaczem Revell. Tak wyglądał aerograf po zakończeniu malowania. "Neglected" nozzle of EVOLUTION is difficult to clean. I admit publicly, I neglected it ... To wash it so I decided to use a stronger cleaner Revell "Painta Clean".

It is a powerful remover, watch out for seals! Only Teflon seals can be safely cleaned, using the "Painta Clean". "Zaniedbana" dysza EVOLUTION jest trudna do wyczyszczenia. Przyznam się publicznie, zaniedbałem ją... Do jej umycia postanowiłem więc użyć mocniejszego zmywacza firmy Revell "Painta Clean". To bardzo silny zmywacz, uważajcie na uszczelki! Tylko teflonowe uszczelki można bezpiecznie myć, przy użyciu "Painta Clean". Nozzles placed in a small plastic container with Revell "Painta Clean". The remaining elements (as before) in a jar with standard acrylic paint remover. Dysze umieściłem w małym, plastikowym pojemniku z Painta Clean Hot water, gave much better results. Revell "Painta Clean" clean nozzle perfectly. All other parts look like new. As you can see, with fresh dirt, Ultrasonic Cleaner can handle without problems. All the time spent on clearing is about 20 minutes (including 10 minutes washing in the cleaner). Gorąca woda, dała zdecydowanie lepsze efekty.

- hot water will give you far better results - water is particularly suitable for washing of a "fresh" soil - nozzles and the smallest elements should be washed in acrylic paint remover - Ultrasonic Cleaner will save you a lot of time spent cleaning the airbrush - Ultrasonic Cleaner perfectly clean hard to reach places and small parts like nozzle - you should disassemble airbrush completely, in order to achieve the best effect - I know that the cleaner can also be used to remove the paint from miniatures and works well Definitely, I do not regret spent 25EURO and recommend to all this type of product. Podobną recenzję myjki ultradźwiękowej innego producenta, możecie przeczytać na blogu Bloody Brushes - Conrad Ultrasonic Cleaner Hobbyclean. Recenzja jest dostępna jedynie w języku polskim. , please , .We all have our favorite airbrushes though you may notice your happiness diminish over time. If you're like me, you clean your airbrush regularly but eventually the airbrush just doesn't seem to work as well as it did when it was new.
While that sounds like an obvious observation, not so fast. Just how thoroughly are you cleaning your airbrush? I've been using Iwata airbrushes for many years now and I really like their design making cleaning an easy process. When it is time to clean, simply release the hose quick disconnect, remove the needle, and clean as needed. When the airbrush goes back together, I shoot cleaner though the brush and either move on to the next color or set the airbrush aside. When I've put a lot of paint through an airbrush, I'll break it down further and run the parts through an ultrasonic cleaner filled with Windex which attacks any remaining acrylics. Over time, I've noticed that the air valve on one was sticking and no matter how well I cleaned another, the needle seems to find some leftover paint and seize after sitting a few days. You know when you're getting tired of the little problems when you start looking at the newest airbrushes. When Iwata recently sent over their cleaning mat with raised edges and their airbrush cleaning kit, I decided to see what I wasn't doing without this set.

I dismantled the airbrush as usual but I realized that I'd never had that little nozzle tip off the airbrush. The tool in the cleaning kit addressed that problem. I've never had the air valve out of the brush either and this too was easy to remove using some pointed needle nose plyers to engage the holes on the retaining nut. For the first time, I've dismantled the airbrush completely and I put all of the parts through the ultrasonic cleaner. Using the small brushes in the cleaning kit, I can access the tiny holes in the airbrush and found where the paint had been hiding even after an ultrasonic cleaning. Even the air valve stem had minor paint contamination which was easily cleaned and while I was there, I used some of the non-petroleum/non-silicone lubricant on the valve and now the double-action trigger articulates just like new. The parts all go back together with ease and those few that did drop fell into that edged mat and stayed out of the carpet. The whole process took about 30 minutes and it worked so well, I cycled my other airbrushes through the process one at a time.